Nodecellar is a sample Application with Backbone.js, Twitter Bootstrap, Node.js, Express, and MongoDB. The source code was made available on Github by its author, Christophe Coenraets, so everyone can dig into it and learn how to use those brilliant libraries and tools.
However, it felt like a key player was forgotten on the invite list : RequireJs, the infamous javascript file loader. Since I was curious to know how difficult it could be to add RequireJs to an existing application and turn all its javascript code into modules, I decided to take a crack at it and to record the process by committing each step on my nodecellar fork on Github.
Why am I doing this in the first place ?
RequireJs has three positive impacts when used to its full potential. It improves :
- web performance
- quality of code
- CI and ease of deployment
Web Performance Optimization
Let’s navigate the nodecellar website and have a look at the network panel:

A bunch of js files and templates are loaded though most of them are not needed right away, they are relevant to other pages, like the about section, the user may never navigate to.
Number One Rule in Web Performance : Make less HTTP requests
We could easily improve the browser display speed by combining the scripts together. It could be one big file containing all the code needed by the application, or several files organized by sections of content.
RequireJs provides an optimization tool that will help us to do so.
Here’s the structure I opted for :
- a base javascript file with all the shared libraries (jquery, underscore, backbone, …)
- a javascript file by main sections
- home.js
- list.js
- about.js
- addview.js
To achieve this goal, it’s important to have a clear view of file dependencies. Unfortunately, JavaScript doesn’t provide any kind of include mechanism. RequireJs does via its Asynchronous Module Definition (AMD) API.
Quality of Code & Modules
RequireJs provides a way to define and require modules.
Each module lives on its own and lists its dependencies.
There are several advantages to this approach :
- it avoids polluting the global namespace
- it ensures loose-coupling
Let’s get to the meat and write some code.
Removing script tags
First of all, we’re going to remove all the script tags from the index.html and replace them with the following snippet :
1 | <script data-main="js/common" src="js/lib/require.js"></script> |
This script tag is going to load the require.js library. Once this file is loaded, parsed and executed, it’s going to request asynchronously the file specified by the data-main attribute. It is a usual practice to name that file main.js but in this case this filename was already taken.
This common.js file will serve as our base file and will have several purposes :
- require all other files we removed from the html page
- bootstrap the application.
Require all js files from common.js
Let’s require first the main libraries :
1 | require( |
If you do so, you will likely end up with this occasional error : ‘Module name “underscore” has not been loaded yet for context: _. Use require([])’.
It happens because RequireJs loads scripts asynchronously and out of order.
Since Backbone depends on Underscore, if ever it is loaded and executed first, an error will be thrown.
To fix this error :
1 | require.config({ |
The shim object allows us to declare dependencies for “traditional” JavaScript files and define which variable we would ultimately like to export. It’s a baby step towards writing modular code without needing any kind of refactoring.
Now it’s time to make our life easier and stop using long filenames everytime we want to refer to a script. Strings don’t get minified so it’s better to shorten them if used repeatdly.
1 | require.config({ |
Here’s how common.js looks like at the end of that step.
Moving the bootstrap code into the require callback
The second argument of the require function is an anonymous function that will be triggered as soon as all the js files are loaded and executed. This is the perfect place to bootstrap the application.
In its original form, NodeCellar was initialized at the end of main.js file. We’re going to move this initialization code into the require callback.
1 | require(['jquery', 'underscore', 'backbone', 'approuter', 'bootstrap'], function($, _, Backbone, AppRouter){ |
Since the diminished main.js file only contains the application router definition, I renamed it approuter.js.
Using RequireJs to load the templates
The NodeCellar app was loading all templates asynchronously when the DOM was ready, which is a good thing. Let’s improve this by only loading templates when actually needed.
RequireJs has a text plugin that allows to specify a template as a text dependency.
1 | require(["underscore", "text!../tpl/WineView.html", "views/winedetails"], |
Here’s the commit summary.
Creating one file by section
My goal is to create one javascript file by section. Those sections are actually already defined in the Backbone router (approuter.js). All we have to do is to create one actual ‘physical’ file by section so we can run the RequireJs optimizer on each of them later.
1 | var AppRouter = Backbone.Router.extend({ |
Then each section file will require what it needs.
1 | define(['jquery', 'underscore', 'home', 'text!homeview'], function($, _, HomeView, HomeViewTpl){ |
Turn js files into modules
So far, the original scripts were not modified. We do use RequireJs to load them but they are not modules yet. Code is still shared accross files through the global namespace.
It’s time now to create well-scoped and self-contained modules. Here’s the steps I took for each file:
- wrap the content into a define method
- list all the dependencies, pass them as arguments in the callback function
- export an object or a function, depending on my needs.
Here’s what the WineCollection will look like after this step :
1 | define(['jquery', 'underscore', 'backbone', 'WineModel'], function($, _, Backbone, Wine){ |
Notice we don’t even need to name it WineCollection anymore.
To use this collection function, we only need to require it.
1 | require(['path/to/winecollection.js', 'path/to/another/module'], function(WineCol, anothermodule){ |
Now if you type WineCollection in the console, you won’t have access to its definition anymore. The global namespace has been successfully uncluttered.
Here’s the commit summary.
Cleaning common.js
Now that all files are modules, list and load their own dependencies, I could remove from common.js:
- all unnecessary shim configuration
- all references to files that were not needed to bootstrap the application (e.g. the paginator, the templates..).
However I kept references to files that were a shared resource shared like jquery, bootstrap, underscore, backbone. After all it was the purpose behind common.js.
Adding a build script
It’s time to give a try to the optimization tool. First thing, we need to include r.js and to create a build script.
1 | ({ |
The mainConfigFile is important. It allows the build script to use the requirejs configuration we already set up in common.js. We could also copy and paste the configuration into that build script but let’s stay DRY.
To run the optimizer :1
r.js -o build.js
The optimization tool will create a copy of the public folder, named it as requested ‘public-built’ and optimize JavaScript assets (and also the css files but let’s keep that for later).
Modifying the server.js file
In order to test the optimized version, we need to modify the node script “server.js” so it serves static files from the public-built in a production environment.
1 | app.use(express.static(path.join(__dirname, (process.env.NODE_ENV === 'production') ? 'public-built' : 'public'))); |
Then run1
NODE_ENV=production node server.js
Now let’s have a look at the network panel.
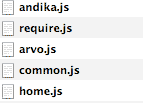
Voilà !
Nota Bene: The andika.js is an external JavaScript file (http://use.edgefonts.net/andika.js) that allows us to use the Andika Web Font. It was not captured in the first panel screenshot though it was already there).